

 In the summer of 2007 we took a raft trip down the East Fork of the Chulitna with our Talkeetna friends and spent a night at a place that has the most amazing collection of river-washed rocks. In the midst of carousing I had the idea of using some of those rocks in a coffee table so I brought back a whole mess of them (which incidentally and for the record pales in comparison to the volume & weight of what most of of our friends brought out). Then in January/February 2008 we had a most enjoyable vacation in California and Arizona - and while in California we stayed at my sister Mary's house in LA. Two things while we were there - we went to the Gamble House in Pasadena, regarded as THE outstanding example of Greeene and Greene archtecture/design (they being Charles and Henry - leading lights of the early 20th century Arts and Crafts movement), and we spent several mornings and evenings in my sister's living room which featured a coffee table custom built for them that was derived from more or less the same style as what we had just seen in Pasadena. Suddenly it all came into focus... and shortly after we returned to Alaska my design was more or less complete.
 The size and dimensions are pretty close to what is in my sister's living room, the "cloud lifts" (the offsets in the horizontal spreaders) are stolen from both Greene and Greene and the guy who built my sister's table, the square plugs are both a Greene and Greene touch and what I previously explored in my dining room table, and the choice of materials - mahogany and walnut - I've used on several other pieces. AND I used the Chulitna River Rocks....
 This little detail roughly doubled the time I spent on the project, but it was a really interesting exercise, allowed me to stay true to my goal of stretching my boundaries with each project, and I think added greatly to the aesthetics of the finished piece. It's certainly unique....
 I've been getting more and more comfortable with chisels, and wanted to incorporate a classic Arts and Crafts detail, the butterfly splice, into my table. Even in as close a detail as shown above, it actually looks okay! The butterfly itself is lacewood.
With this project I really think I've elevated my hobby to a new level. Every joint on this piece fit perfectly and honestly, I think it would have been almost as stable if I hadn't used any glue at all! Most rewarding...
The finish is oil with two coats of rub-on polyurethane on the table and shelf tops, and wax.

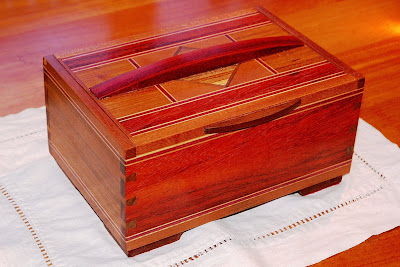 The boxes were made primarily of padouk and canarywood, with accents of maple, purpleheart, bloodwood, walnut, zebrawood, and ipe.
  With each project I seem to be using hand tools more and more, which is gratifying. What one can do with a couple of sharp chisels can't be duplicated by machine, and chisels, files, and a block plane are perfect for ensuring proper fitting of the myriad parts and pieces that go into my projects these days. AND there's less dust. AND I get to listen to music and maybe even sip on a beer while I work - luxuries not afforded with power tools.
  I'd read an article in Fine Woodworking about "bent wood lamination" and wanted to try my hand at it. I'd also wanted to get away from the standard rectilinear style of almost everything I'd built to date. And then I saw a picture of an occasional table that used a large river rock as the base - the wheels in my head started turning, and the result was this table.
 I don't think I've ever struggled so much with a project - either before or since. Some of it was the complicated geometry, some of it was my first serious try at inlays, but I think alot of it was just trying to get the piece to meet my ideas of good form and lines.
 The piece sat uncompleted in my shop for the better part of a year before I finally got up the gumption to complete it - but even then it wasn't finished.....
 We'd gone to visit my in-laws in upstate New York for Thanksgiving 2006, and while there I got the opportunity to tour the Stickley furniture factory in Manlius. Gustav Stickley was one of the leading proponents of the Arts and Crafts movement in the early part of the 20th century, and his brothers Leopold and John George founded the furniture factory that is still the leading manufacturer of mission-style furniture. Not sure a tour like that would be everyone's cup of tea - but I was fascinated. Anyway, the tour as well as subsequent reading into the Stickleys and the Arts and Craft movement led me to the inspiration for this table lamp. The shade is a takeoff of Frank Lloyd Wright's "Tree of Life" motif that he used in much of his early stained glass. The base, although imbued with a vaguely Arts and Crafts feel, is pretty much my own invention.


 I made these picture frames for a set of prints I bought while in the Everglades. The wood is maple, lacewood, and bloodwood with walnut splines. My first fun with exotic hardwoods.
 Two cutting boards to commemorate our two most important fish here in Alaska - the halibut and the salmon. The woods used are beech (for the bodies), lacewood, bloodwood, and zebrawood. This was the first time I tried joining freehand cuts. The secret - double-stick carpet tape! Overlay the two boards with the tape between them and one (very nervous) cut on the bandsaw!
 Much of early/mid 20th century american and european furniture has been heavily influenced by classic japanese design. However dilute, these values also inform my work. Going way back before my interest in furniture, I 've always been fascinated by traditional japanese gardens and especially the stone lanterns that are often times present there. I have no skill or experience whatsoever in masonry (not that I wouldn't like to try it some day), so I decided to try to adapt the style to wood. While hardly on the level of "fine furniture", I thoroughly enjoyed putting these two lanterns together - and they definitely add something to the yard.


 The bed is predominately cherry with walnut veneer in the pediments at the tops of the head and foot. Finished with oil and wax.

